

I've just recovered an old frame with fabric for The Child's room. As far as classic proportions go, this one's too small for the stand, but, in this case, it was the look we were after.

The other one I made a while ago but have included to give you an indication of different shapes and trims.

Need to start with a frame. This is an old lampshade I bought for about 20c at a fete and stripped the old fabric and lining off.


Using a cotton tape such as this, dot a spot of craft glue to the to the top ring of the frame and stick tape to frame just behind one of the side struts. With your thumb keeping the beginning of the tape secure, bind the tape tightly all the way around the top ring. Cut the tape and secure with another spot of glue and secure with a peg until dry.
It's important that this tape is tightly wound all the way around, as you'll be sewing into this later.


Do the same to the bottom ring.
Tip: keeping a pin in the tape makes it easier to handle when wrapping the rings.

Now it's time to make a pattern. Do this by tracing down the length of a side strut and then slowing rolling the frame halfway across across its top and bottom lengths, marking as you go.
Be careful not to get pencil on the binding tape. You could trace the frame before you bind, but the tape does give the frame a better grip on the paper.
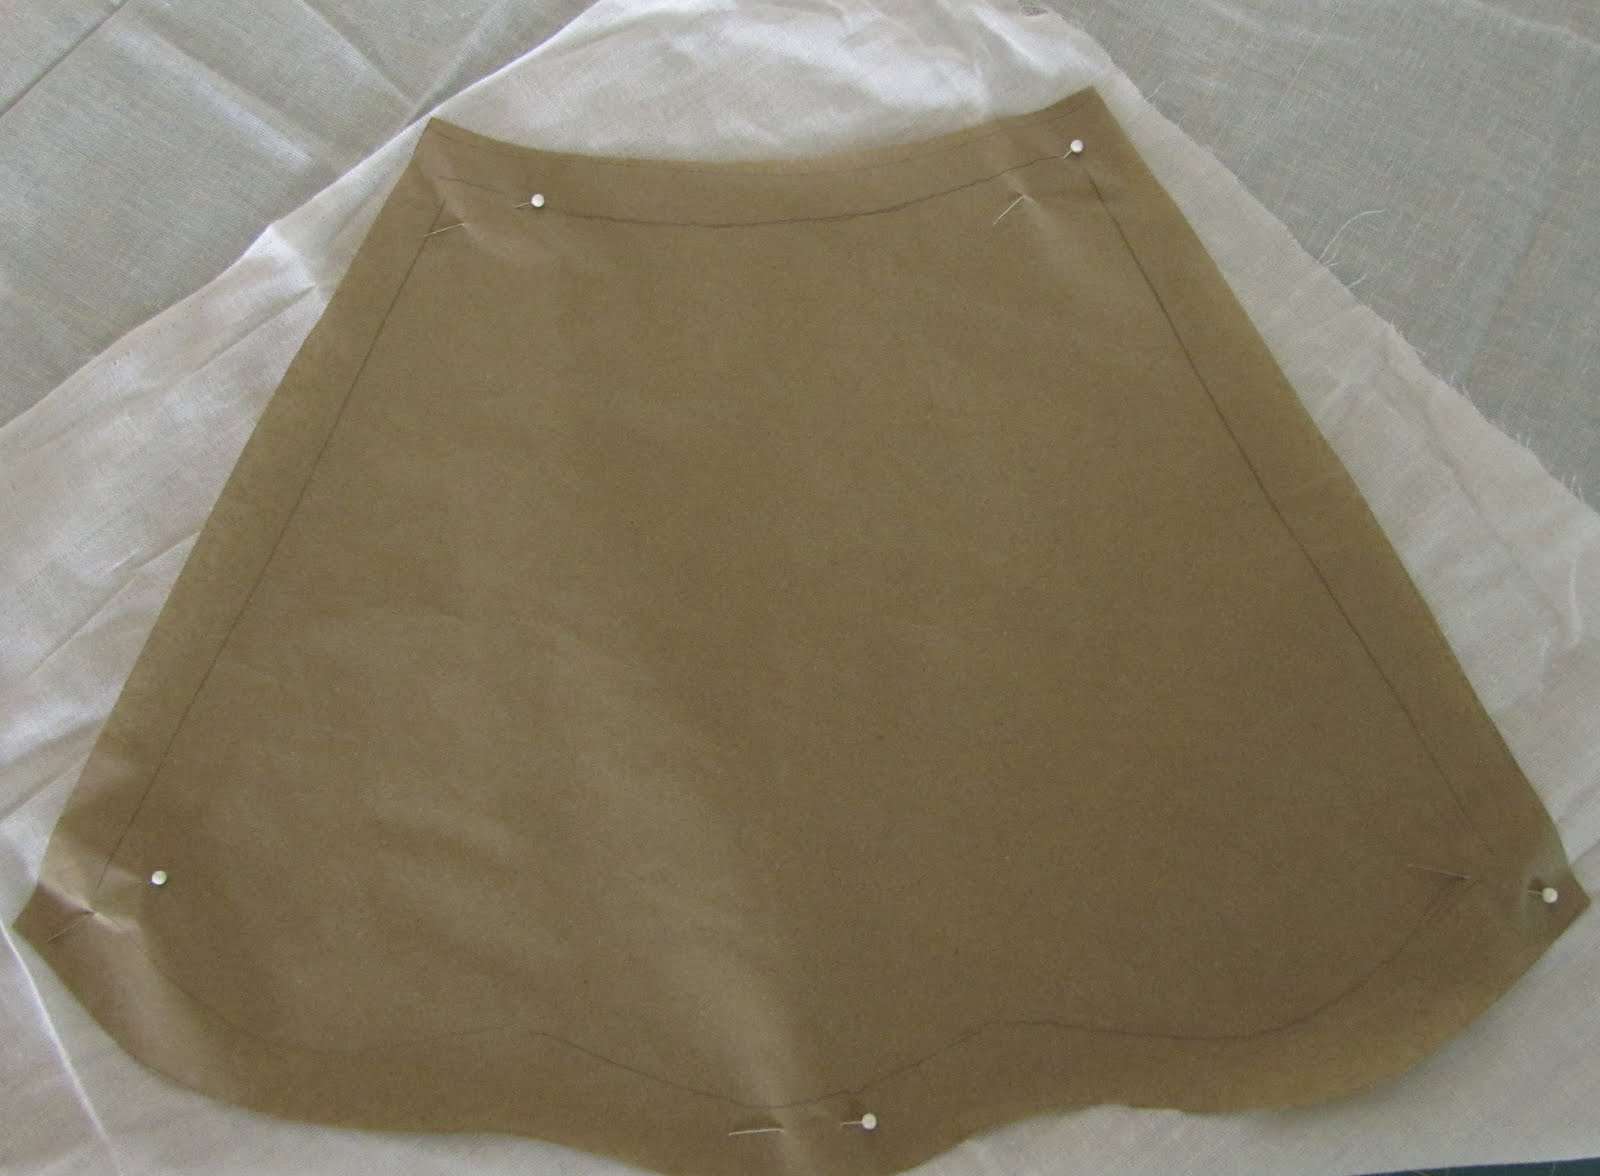
Add about a 2cm allowance to the pattern.
Now it's time to make the lining. I've used a thin cotton fabric, which must be cut on the bias. Stretchy fabric is ideal and I've used swimwear lining in the past. If using stretch fabric, cutting on the bias isn't important.
You will need to cut two pieces.

Using a machine, sew at seam allowance but don't backstitch at top or bottom of seams.

Slip the lining inside the frame with the seams facing out, ie, when looking into the top of the frame you shouldn't be able to see the seam allowance. Match seams to side struts at top and bottom.

This is like the first fitting of a made-to-measure dress. The lining will undoubtedly come out for adjustments: this step is to determine by how much. Working with the bias or stretch, pin the top and bottom aiming for a tight fit.
Manipulate the fabric until you achieve this, which will probably involve removing the lining and taking it in a bit at both sides and trying again. This is the custom-fit stage and you'll be stretching the fabric at both top and bottom, moving pins all the time until the lining is smooth and tight without any bumps. (You basically have to ignore the struts that connect to the ring (called the gimbal supports as the ring is called a gimbal ring) and pull the fabric around them at this stage.)
Be patient as the lining rarely fits perfectly first go.

When happy with the fit, such as above, take the lining out and sew a second row of stitching about 2mm from the seams in the allowance for strength. Trim the seams allowance to about 3mm or as small as the fabric will allow.

Now it's time to refit the lining in preparation for stitching. When you've got it fitting tightly, you'll need a sharp pair of scissors (those little scissors used for snapping sewing-machine threads are ideal) and cut the lining to accommodate the gimbal supports.
If you're using stretch fabric, dot the the cut with fray stopper and wait until it dries. This is really important as stretch fabrics easily pull.

The lining is almost ready to be sewed to the frame.

First, though, you'll want to hide the cut fabric around the gimbal edges by winding a little of the cotton tape around them.

Using quilting cotton, which has been run through a wax block, and a quilting needle you need to stitch the tape on in the same way you will the lining. I didn't take a pic, but the method is the same as the pic below.
The wax helps the thread move through the wound tape smoothly. Without it, the thread tends to snag.

Put a knot in the thread and work the needle on the outside of the frame. You don't want stitching to show at the very top of the lining as this will be on view at the end. The stitching will later be covered with bias binding.
Once the gimbals are covered, snip the cotton tape close to the stitching. Stitch the lining at top and bottom of frame.

Using the same pattern, cut fabric pieces (right side of fabric facing each other) for the outside. Sew seams, turn inside out and slide over the frame.
Fit in the same way you did the lining. Again, be patient. I had to do three adjustments to the seams with this one (must be out of practice).
Trim seams in the same way as the lining.

Stitch fabric to frame in the same way as the lining.

Trim fabric.


Make bias binding and then glue one end at seam. Dot glue onto binding and stretch over to hide stitching.

When you get to the end, cut bias but leaving enough to fold over edge and glue over beginning.
If you've done a really good job, your finish will be neater than mine without any glue stuck to it!
Good luck!
Please feel free to ask any questions.
A few tips:
. When fitting the lining and outside fabric, have the sharp ends of the pins pointing inwards (unlike my top pic) to avoid pricking yourself.
. Don't use this method for a "Tiffany" style or any ball-shaped frames. It won't work.
. I don't use flame retardants on the fabric, but you may wish to.
. I do use bulbs that don't give off a lot of heat and make sure they're at the very least 5cm away from the fabric at every point.
. I alway use cotton fabric for the outside.
. If the frame you're covering isn't painted white, or is old like the one I used, cover all the frame (excluding gimbals) with tape as uncoated metal will show through when the light is on.
. I didn't include instructions on how to make bias binding, as this post is already almost as long as a book.
. If you do make bias binding, don't overlap the fabric at the back as you want to avoid bulk. Make it meet in the middle, or even leave a little gap, instead.
To see what others are creating today go here.
What a great tutorial! I'm wanting to cover a couple of lamps and was wondering how I would go about it! Perfect timing!
ReplyDeleteJill @ Creating my way to Success
http://www.jembellish.blogspot.com/
fancy pants!! This looks fabulous, i'm envious of your patience and skill (and career, if i'm honest!).
ReplyDeleteLovely to find you
xo em
Awesome - I've got a lampshade that desperately needs a revamp - I was too scared to start it, knowing I would stuff it up and the lamp would end up nude for aaaages while I got round to buying a new one.
ReplyDeletePues yo no entendí nada!!!
DeletePrefiero un vídeo
Fantastic, I have two lampshade covers that are in urgent need of repair. Never seen anything like this tutorial before Thank You
ReplyDeleteHello Vera,
ReplyDeleteWhat a fantastic tutorial and the lampshade is so lovely. Thank you so much for sharing. I am pinning it:)
This I call a tutorial! great description, very interesting!
ReplyDeleteYours is so pretty and neat. I've only tackled the bell shaped ones so far but will definitely give this a go and when I do, I will search out your excellent tutorial. Thanks
ReplyDeleteKate x
It is a very pretty lampshade and an extremely helpful tutorial. I have always wondered how concave shades should be covered and now I know. Thank you. T x
ReplyDeleteI KNOW all of this but have been too 'scared' to have a go. Because my shades are very shaped, I am expecting great fitting issues. However, after seeing your photos and appreciating the difficulties you had with fitting I might bite the bullet and redo my lampshades. Your tutorial is excellent, the step by step photos are very reassuring. You're a star!
ReplyDeleteMonday! Fabric shopping!
I really appreciate this to tutorial..it was a real blessing for me. I have 3 lamps I bought from E.A. and each had a lined shade on them. The liners all eventually just fell apart...no doubt from my use of bright bulbs..they are all 3 way lamps. The outside fabric is fine on them. I just need to replace the liner. I know how to sew. I asked someone how much they charge to do the work...and it was to much. And I did not want to replace the shades with new lined ones. So I'm going to challenge myself and do this myself. I really can not thank you enough for taking you time to write this up. God bless you and your home. :)
ReplyDeleteI so much appreciate this tutorial. I had considered using adhesive styrene until I read about the plastic emitting poisonous gas as the light warms up the styrene. Besides, the thought of a beautifully lined, custom lampshade, I feel, takes the lampshade project to another level. What a treat to have such a beautiful shade in my home. Again, thank you so much for sharing. I have been looking for days for help.
ReplyDeleteThank you so much for sharing. Your Lamp shade is just so lovely, and I cant wait to have a go myself. :)
ReplyDeleteA wonderfully thorough tutorial - thank you.
ReplyDeleteLooks easy enough?! :/ I'm going in....wish me luck!!
ReplyDeleteThis is straight up the best tutorial I have seen on how to make a custom lampshade. Thank you so much. By the way....if Homebodying isn't a real word, it should be.
ReplyDeletecan you please advise if the outside fabric is cut on the bias too, as I'm making a lampshade at the moment for someone and have cut the material on the bias and is ver loose in areas but cannot stretch it our anymore- Help!!!
ReplyDeleteThis is really really helpful. Going to attempt a scallop edge frame with a tartan shade. Hope to use a stretchy polyester nylon lining. Thanks for the blog
ReplyDeleteI’m so glad I found this. Thank you soooo much. Xx
ReplyDeleteGlad I stumbled on this, and thanks!
ReplyDeleteWow, great post; i´ve always wonderd if I could recover an old lamp myself, As soon as I find a lamp for this, I´ll give it a try ;)
ReplyDeleteI bought an old lampshade almist the same shape, especially to recover for the table lamp in my bedroom. I stripped off the old cover and the frame's now been standing for about 8 weeks waiting for me to have a go. Your tutorial is exactly what I need and I will start tomorrow. Thank you so much.
ReplyDeleteWonderful tutorial!! I have two lamp shades that need to be recovered. I have already removed all of the fabric and this is EXACTLY what I needed to be able to recover them and give them to my brother for his lamps. Excellent tutorial!!!
ReplyDeleteI just found this blog. THANK YOU!!!! I have been looking for make-over instructions for a tapered lampshade for an oak-base upright lamp my Mum originally covered in raw silk and brocade back in the early '70's. This is by far the best I have come across. I really appreciate the detail you have gone into to create this blog!
ReplyDeleteok well like many before me I took the plunge - you certainly made it look easy. I removed the covers and tried to use them as a pattern - disaster - can't get the outside fabric to taper to the frame - not sure I should have started - as a previous person posted.... I have nude lamps sitting patiently for me to get my ah ha moment happening :-)
ReplyDeleteI do not like this at all. It is very confusing to read, follow and understand. I will look for a utube demonstration instead. Yes, I am a sewer and a tailor but prefer a visual. Sorry.
ReplyDeleteThanks for a nearly glue-free, skill rich tutorial!
ReplyDeleteThank you. What a great explanation .... exactly what I am looking for. :)
ReplyDeleteThank you. What a great explanation .... exactly what I am looking for. :)
ReplyDeleteThank you. What a great explanation .... exactly what I am looking for. :)
ReplyDeleteI don't think the shade is too small! It's rather cute that size.
ReplyDeleteThank you so much for such clear informative instructions.
ReplyDeleteThe best tutorial on the net, can't wait to get started.
Je suis très contente de vous avoir trouve ,un bon copain me fait cadeau de magnifique lampe et je veux les mettre en valeur avec des abat jour magnifique .cela donne une ambiance superbe et mettre des guirlandes MAGIQUE
ReplyDeleteWhy do you only use cotton material on the outside and does it matter what kind of thread?
ReplyDelete