Thursday, March 31, 2011

Adoor


Yesterday it was time for The Child's yellowing bedroom door to get a lick of paint. Removed bits of sticky tape, keep-out notes and the letters that had been on the door since she was a baby. Most of them anyway, as one had fallen off some time back.

Painted the hall side in Dulux Lexicon quarter strength, which is a brighter white than what will be on the trims in her room, and the inside of her door in Dulux Whisper White.

The slate blackboard and duster was picked up from The Bay Tree a couple of weeks ago, which I attached this morning so she could leave us keep-out notes and come-in notes to her friends in style. The blackboard was a winner.

Before school she advised that we would have to answer agelbra equations she'd write on the board before we could come in. The Husband and I stood looking at the first one for a while before she let us in out of pity.

To see what others are doing today in their creative spaces go here.

Before shot

Wednesday, March 30, 2011

Natural selection


I couldn't open a link to the Book Depository fast enough when I discovered the queen of seed head linocuts, wood engravings and screenprints, Angie Lewin, had a book out that contains more than 80 of her prints.


If you don't know her, she's a British artist who often draws her inspiration from the type of nature many of us would just walk past, ie, seed heads, grasses and even weeds.


She then takes the inspiration and transforms it with a mid-century type of style referenced through 21st century eyes.


If the book wasn't so beautifully bound I'd rip it up and stick the pages all over my walls.


I still might.


To see more of her work, go here.

Images in order after cover: Salthouse, pg 53, Spey Path I, pg 105, Winter Spey, pg 113, Agapanthus, pg 123, The Moonlit Cup, p167

Tuesday, March 29, 2011

Pepper spray


What with birthdays and floor stripping these last few weeks, I haven't been able to get to the Saturday morning farmers' market for at least a month. One of the things I miss most is freshly cut flowers.

I'm so used to market prices that I almost fall over in florists when told the prices of the bunches before me. But as our floors looked so pretty I dearly wanted some while I was out and about this morning so I popped into Jodie McGregor in Annandale.


These cuttings taken from a pepper tree seemed just the thing for autumn and I loved them instantly. At $21, and assured they'd last two weeks if I didn't mind a bit of leaf drop, I even remained standing when I handed over the cash.

Monday, March 28, 2011

Contained


Someone commented that I have a compulsion with tins (in a good way, I hasten to add) so I feel I must also admit to another: boxes. I use them to organise all the bigger bits and pieces that don't fit into tins.

The three I couldn't live without are, firstly, the two that soak up all the plastic kitchen containers that used drive me nuts floating around a cupboard. I was like a dog digging for a bone sometimes trying to find the lid to its matching container. Now I pull the box down to the benchtop and dig away on a much smaller and much less irritating scale.

Ramekins were other items that refused to behave as they wouldn't stack without toppling over at the very softest of nudges or they'd take up an enormous amount of room lined up on a shelf. A third Ikea box contained their attitude in the naughty corner of a kitchen cupboard and we all get along fine now.

Friday, March 25, 2011

Floored


The floor has finally been sanded, limed and sealed. Today The Cat has run from room to empty room probably wondering what the hell is going on and why we keep moving stuff about. I ask myself the same thing sometimes.


While we're allowed to walk on it today, the furniture returns tomorrow.


We're very happy with the end result. We used Feast Watson Liming Solution and a water-based satin sealer. We used the liming solution to counter any yellow or orange tones the boards may throw up, so to speak, rather than to create a white floor. Very Swedish, I think, but perhaps that's because I've watched the two Stig Larsson movies while camped out in the dining room this week. Pass the herrings, Sven.

Please ignore the bright blue masking tape above hallway skirting boards, which ruin the whole calm and netural effect somewhat, as I have a date with a paintbrush this weekend. Again.

Before shot of hallway

Thursday, March 24, 2011

How to make a lampshade


The Child's room is one step closer to being redecorated with the making of this new lampshade. As promised, a how-to follows. The only problems being I don't know of anywhere styrene, the plastic backing, can be bought in retail quantities. You'll either need to ferret out something similar or use cardboard. I'm not a fan of cardboard, a. because light doesn't permeate it well and b. even slight knocks will bend it out of shape.

This style of lampshade is known as a bonded lampshade. Quite simply, that's one that has fabric or paper bonded, ie glued, to a backing. Those pretty granny shaped ones, with scallops or what-have-you are called soft lampshades. A tutorial on those further down the track, perhaps.

For a bonded lampshade you'll need a top and a bottom ring. Here's a wholesaler who sells (and sends) to individuals or I've sometimes seen them in craft shops, even Spotlight on occasion. You could rip an old bonded lampshade apart but, chances are, you'll bend the rings getting the backing off.

If you're still with me...


I'm using 10 inch rings for The Child's lampshade with a height of 20cm. (For some reason, lampshade suppliers still use imperial measurements. I know not why.)

To calculate the length of backing you need, roll a ring along a ruler then add 4cm. For instance, my 10 inch ring rolled along for 81cm, so I cut a piece of styrene 85cm x 20cm.


Twirl it around a ring to make sure you're on the right track.

I always cut my styrene a little longer than needed in case I've made a miscalculation. This step shows I haven't so I trim a bit of length off as a maximum of two centimetres is all that's needed for the overlap.


Lay it on your fabric and cut a piece with spare fabric, maybe around 4cm top and bottom, to make life easier later.


Use spray adhesive to stick backing to fabric. Turn it over so the right side face you and smooth away any bumps with a cloth.


Trim fabric, leaving roughly 1.5cm depending on thickness of fabric. My barkcloth has been washed many times and is quite thin. (I actually cut too deep leaving only 1cm causing me a bit of grief later on, but you don't need to know about that.)


For the ends, cut right to the backing by taking a couple of ml off either side, as it leaves a sharper edge.


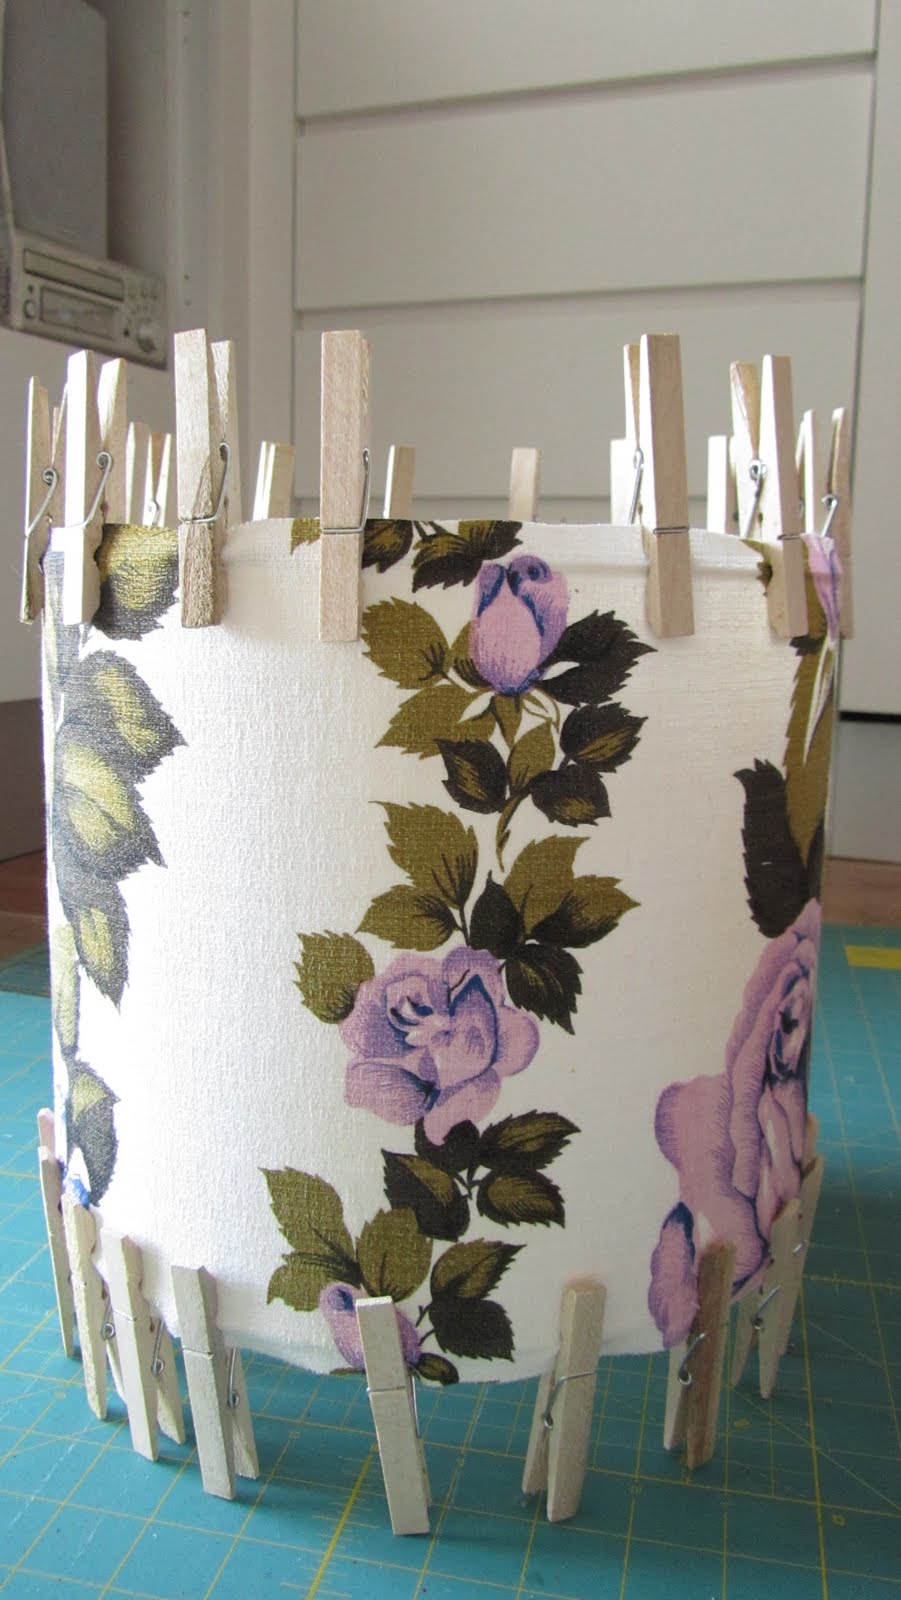
Now roll the bonded fabric around one of the rings and use wooden pegs to get the fit tight. This will take a bit of repositioning with the pegs.


Sit the ring so that it sits under the backing but comes right to the edge.


Do the same to the other ring.


You can see the overlap, which will be glued very shortly creating the basic drum shape.


Grab a pencil and draw a line on along the overlap.


Using craft glue, squiggle a fine line in the gap. Don't use too much glue as it can pucker the backing.


Attach other end right up to the pencil line, place something heavy to keep it all in place. I usually have a cup of tea around this point - or come back in about half an hour.


Apply a thin bead of glue to either the inside top or bottom of lampshade and slip a ring in place and use pegs to keep ring from slipping.


To the same to the other end and have another cup of tea.


Apply a little glue to one of the rings and push fabric over. This is best done in sections as craft glue dries quickly.


Now here's the secret to a professional finish: using a thin knife gently push the fabric behind the ring.

Do the other ring and you're done.

Good luck.

Find out what others are doing in their creative spaces today here.

Wednesday, March 23, 2011

Small Things Simple Tins

I'm in danger of having to rename this blog Small Things Simple Tins.

Despite posting that I'm not in need of any more vintage storage tins, I find that I'm the proud owner of yet another tin. As it's not an actual vintage tin, I think I've successfully skirted around my own proclamation. Anyway...


Picked this generously sized tin (27cm x 23cm with a 20cm depth) at Trim's Leichhardt yesterday. Regarded the panettone it contained as bonus rather than a lure, but it is delicious. When I opened the lid, the smell of Italy wafted out (that slightly marzipany sweet almond aroma that I love and The Child loathes).

A great panettone, a new biscuit tin and memories of an Italian holiday all for $14.99. How could I not?

Tuesday, March 22, 2011

In the can


I remember these canisters from my childhood kitchen, which disappeared in my youth - the canisters, not the kitchen - when my mother, and the rest of the world, fell in love with plastic.

They turned up again recently and I've put them to good use in my kitchen, but not as a set as that's too big a look for me. Some are in cupboards, some are on shelves, depending on what their use is.

They're surprisingly airtight too. We had a problem with pantry moths this year but any flour that was in the tin was always safe. So why didn't I use the so-far-unsed fourth tin for rice, I ask myself?

Monday, March 21, 2011

Calming crochet


Our house became considerably smaller over the weekend (and it wasn't huge to start with).

Bright and early this morning, the Floor Man arrived to sand and lime the floorboards in our bedrooms, hallway and living room. We had planned to stay the week in a short-term rental but nobody would accommodate The Cat - not even so-called pet friendly executive rentals. So we decided to block off the back of the house and camp there for the week.

Bedroom in progress shot (but after painting of skirting and picture rails in Dulux White on White).


On Friday, we packed. On Saturday, the removalists came and whisked all our things off to we-know-not-where. On Saturday afternoon, we built our camp in the dining room. On Sunday, I had the bright idea of painting our bedroom before the heavy French armoire returns.

Bedroom after painting with two coats of my new favourite colour: Resene's White Pointer.


Today, as the sweet noise of sanding fills my ears, I'm going to do nothing but crochet as I'm so very, very tired. The top shot is a WIP shot of the hexagon rug I started way back when. It's been ignorned lately as I've been distracted by other woolly projects but today I feel in need of some calming crochet.

The pattern calls for 56 hexagons (I think, but the book has been packed and whisked) and I've got 24, which I'm happily miscalculating to be half way there.

Friday, March 18, 2011

Bed linen stock-up


Getting ready for autumnal snug as a bug bedding by adding a few much needed pieces to the linen cupboard. Ordered the Maison duvet cover, and two Euro pillow covers, in white/natural from Aura last week and it all arrived a few days later.

Couldn't resist the free shipping for orders over $150 plus 15% off for new subscribers offer. Loved the natural pillow cases instantly but wasn't sure about the duvet cover as the white fabric (one side is white, one natural) seemed a little thin. Gave it a wash to get rid of the chemically smell, which also gave the cotton/linen fabric a lovely tumbled look, and slipped my duvet in. The white side is a bit thin but doesn't cross the line into too thin. Close though, but I'm happy.

The ticking pillowcase was picked up with a Seneca Textiles duvet set at a recent Peter's of Kensington sale - and I loved it instantly. At less than half price, $86 for a queen-sized set, it was a complete bargain. Here's something similar from Seneca, but the style I got doesn't seem to be available online.

The vintage pillowcase comes from the last Frankie stand at the Finders Keepers market at Carriageworks. There were two, so I snapped up both for a mere $7 each. Love them. I see another Sydney market is scheduled for May 20 & 21 so I'll be sniffing around the Frankie stand for more vintage lovelies.

Aura's Maison

Last, but not least, I've got my eye on some mushroom-coloured linen that's being released next month by Wallace Cotton. I'm a fan of Wallace Cotton products but I'm not a fan of its pricing policy as they don't offer Australian shoppers the same price as New Zealand buyers. For instance, the set I have my eye on costs $277.90 both in Australian and NZ dollars, which means, as they're a New Zealand company, they actually pocket $NZ377.70 (at today's conversion) plus delivery when they convert my dollars.

Wallace Cotton's Tess

I enquired about this once and was told it helps to cover their shipping and that even though many items were considerably more expensive for Australians to buy, it was still good value. The NZ price is no longer visible on the Australian website, which may or may not be a coincidence. I wouldn't mind paying a bit extra but feel a third is a bit rough so will have to think a little (actually much) harder about this one. Pretty though.

Bedroom images via Aura and Wallace Cotton

Thursday, March 17, 2011

Candle wrap


Even though the sun is beating down outside, my mind will not be swayed from thinking about all things cocoony, cosy and cool weather. So I brought the hanging lanterns I made for a Notebook story that have been hanging outside inside and gave them a makeover. Tossed a Bonne Maman jar in there while I was at it.


Used a piece of muslin, a scrap of hessian and some left-over fabric to wrap around the jars and then secured them with big pins I bought at Spotlight a while back. As all these fabrics are quite gauzy, light will pass through quite easily...

...as would the pins through little fingers so obviously not ideal where teeny tiny ones can grab them.

To see what others are doing in their creative spaces today, pop in here.

Wednesday, March 16, 2011

Pottering


Inherited a few pot plants over the weekend as friends are moving interstate and have to leave their plants behind. Enter this frangipani. It came to me in a plastic pot that was inside the terracotta pot above. While I love terracotta pots, the colour of them don't really work in my garden as all the others are weathered whites, light and dark greys, zinc and galvanised pots. So out came the paint...


First I sprayed the inside of the pot with a waterproof sealer.


Then I painted the outside with two coats of Resene Iron, left over after painting our lounge room last year. In went some potting mix, the frangipani and some compost from our bin that all our fruit and veg scraps get thrown into. The compost had been cooking for a while (we have two bins, one on the go and the other breaking down).

Now all I need is the Husband to lift it off the garden table...