

The Child's room is one step closer to being redecorated with the making of this new lampshade. As promised, a how-to follows. The only problems being I don't know of anywhere styrene, the plastic backing, can be bought in retail quantities. You'll either need to ferret out something similar or use cardboard. I'm not a fan of cardboard, a. because light doesn't permeate it well and b. even slight knocks will bend it out of shape.
This style of lampshade is known as a bonded lampshade. Quite simply, that's one that has fabric or paper bonded, ie glued, to a backing. Those pretty granny shaped ones, with scallops or what-have-you are called soft lampshades. A tutorial on those further down the track, perhaps.
For a bonded lampshade you'll need a top and a bottom ring. Here's a wholesaler who sells (and sends) to individuals or I've sometimes seen them in craft shops, even Spotlight on occasion. You could rip an old bonded lampshade apart but, chances are, you'll bend the rings getting the backing off.
If you're still with me...

I'm using 10 inch rings for The Child's lampshade with a height of 20cm. (For some reason, lampshade suppliers still use imperial measurements. I know not why.)
To calculate the length of backing you need, roll a ring along a ruler then add 4cm. For instance, my 10 inch ring rolled along for 81cm, so I cut a piece of styrene 85cm x 20cm.

Twirl it around a ring to make sure you're on the right track.
I always cut my styrene a little longer than needed in case I've made a miscalculation. This step shows I haven't so I trim a bit of length off as a maximum of two centimetres is all that's needed for the overlap.

Lay it on your fabric and cut a piece with spare fabric, maybe around 4cm top and bottom, to make life easier later.

Use spray adhesive to stick backing to fabric. Turn it over so the right side face you and smooth away any bumps with a cloth.

Trim fabric, leaving roughly 1.5cm depending on thickness of fabric. My barkcloth has been washed many times and is quite thin. (I actually cut too deep leaving only 1cm causing me a bit of grief later on, but you don't need to know about that.)

For the ends, cut right to the backing by taking a couple of ml off either side, as it leaves a sharper edge.

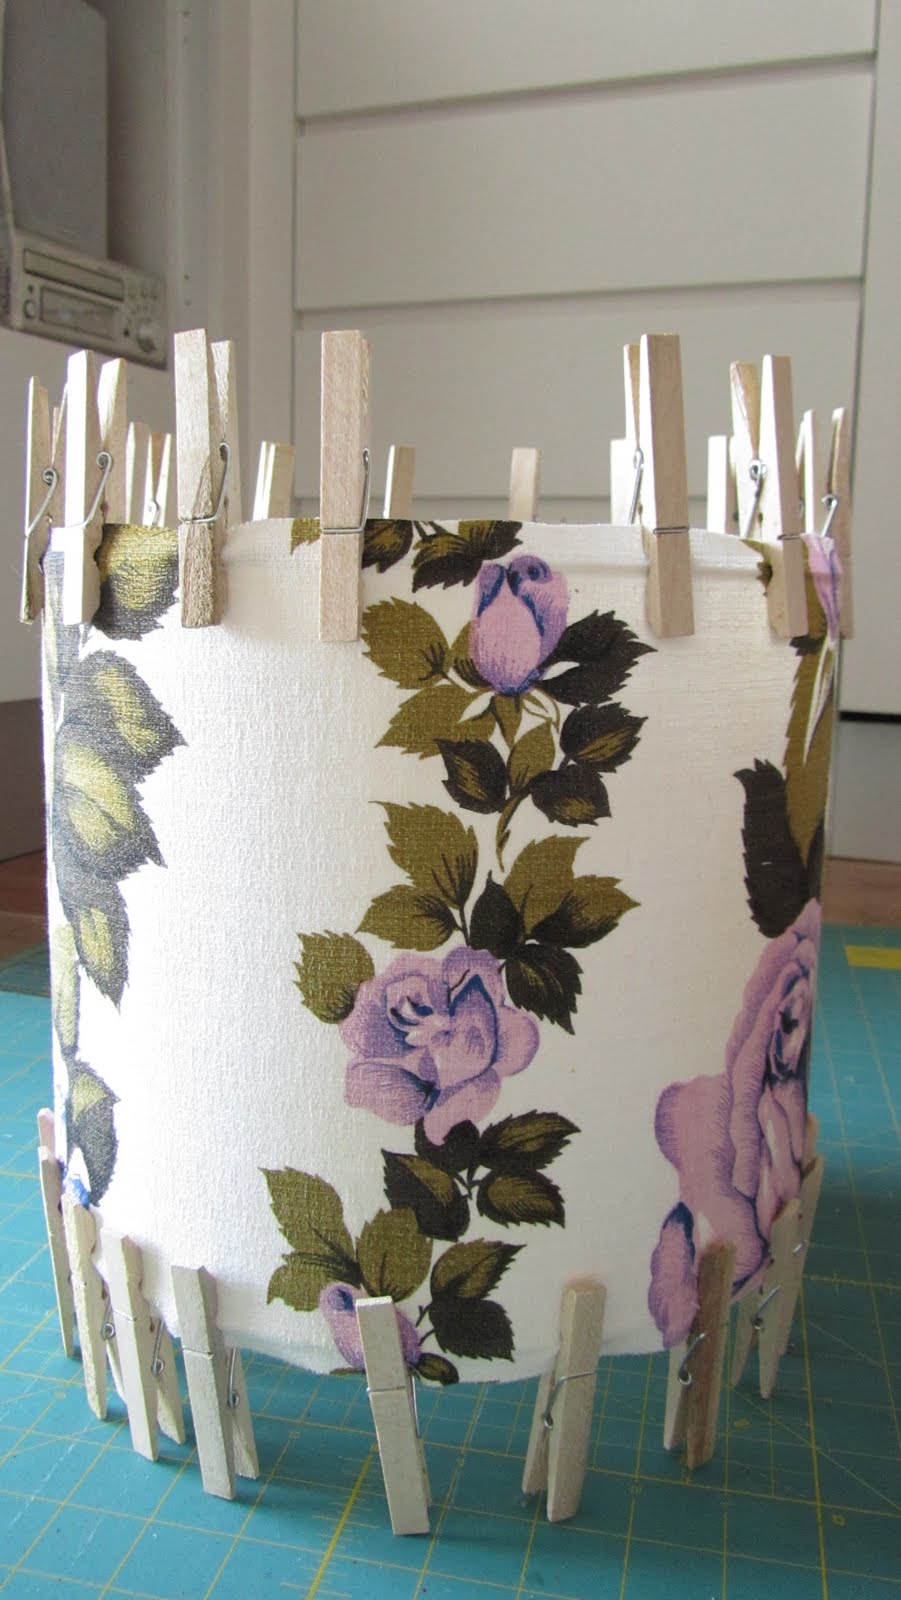
Now roll the bonded fabric around one of the rings and use wooden pegs to get the fit tight. This will take a bit of repositioning with the pegs.

Sit the ring so that it sits under the backing but comes right to the edge.
Do the same to the other ring.

You can see the overlap, which will be glued very shortly creating the basic drum shape.

Grab a pencil and draw a line on along the overlap.

Using craft glue, squiggle a fine line in the gap. Don't use too much glue as it can pucker the backing.

Attach other end right up to the pencil line, place something heavy to keep it all in place. I usually have a cup of tea around this point - or come back in about half an hour.

Apply a thin bead of glue to either the inside top or bottom of lampshade and slip a ring in place and use pegs to keep ring from slipping.


To the same to the other end and have another cup of tea.

Apply a little glue to one of the rings and push fabric over. This is best done in sections as craft glue dries quickly.


Now here's the secret to a professional finish: using a thin knife gently push the fabric behind the ring.
Do the other ring and you're done.
Good luck.
Find out what others are doing in their creative spaces today here.
Blimey - thats pretty impressive. I wouldnt of ahd the first clue how to even start such a project. Great tutorial. I'm bookmarking it in case I ever feel brave enough to make my own.
ReplyDeletegreat tutorial, that lamp shade looks amazing. I did something similar with my pendant lamp shades, I think the pegs work really well at holding it all together. Glad to have found your blog today - loved your work at Notebook!
ReplyDeleteWow - thanks for the tutorial. Your lampshade looks lovely. I'm sure going to use this when I make over our bedroom!
ReplyDeleteLooks lovely, love the old fabric. Thanks for the DIY!
ReplyDeleteI've never done a lampshade before but I'll definitely bookmark this tutorial - thanks for your generosity!
ReplyDeleteThank you so much for this tutorial. I can't wait to try it out!
ReplyDeleteUp til now ive been the one who does those dodgey jobs of placing fabric sneakily (and sometimes badly) over old shades and sewing them on. Not anymore! This is a life changer :)
ReplyDeleteI've learned so much from other bloggers that I was more than happy to add something to the pot.
ReplyDeleteThanks for your comments. They're much appreciated.
I'll do another tutorial down the track - this time on soft lampshades - where all the materials are easy to source.
I am now on a blinkered mission for the relevant styrene business! Excellent blow-by-blow tutorial - you have me INSPIRED.
ReplyDeleteGreat tutorial!
ReplyDeleteI've been wanting to make a lampshade forever. And like Tania I will be looking for styrene too (have already emailled the wire people!)
Thanks Vera :-)
Cool idea! I get bored with what you find in the shops... and I don't like to have what "everyone else" has... a personal touch is always nice :)
ReplyDeleteGreat! But where do you buy the styrene.. I've been looking for months!
ReplyDeleteI'm in Australia but I buy my styrene from the USA. It seems there are only a handful of places that sell the adhesive kind. It's called pressure sensitive styrene, and is sticky on one side with a peel away backing. The sticky side goes face down onto the reverse of the fabric you want to use for the outside of the shade. I am having problems (see below post) with keeping the lining smooth and nice, as the spray adhesive seems to be lifting but it isn't necessary to line lampshades, i just want to master this next step. The staff at Lamp Shop are very helpful and knowledgeable. This is the link http://lampshop.com/Merchant2/merchant.mvc?Screen=CTGY&Store_Code=ls&Category_Code=08_01_SHADE_LAMINATIONS. Good luck!!
DeleteBought mine from amazon. I have read this tutorial so many times and yet I am still here with my material measured and cut on my ironing board but still hesitant to make a move
DeleteThis comment has been removed by the author.
ReplyDeleteThanks so much for sharing your instructions. Your lamps are all adorable. I like Lillie's new mirror too! Just perfect!
ReplyDeletelampshades for sale
the link for the wholesaler doesn't work
ReplyDeleteI am going to try this to save a chandelier - will let you know how it goes! THe link to Lampshop.com worked initially but not just now... posting again - they were so helpful about the type of styrene to buy for my project: https://www.lampshop.com/
ReplyDeleteGreat directions Vera, I would feel confident following these.
ReplyDeleteWhat kind of glue do you use for around the rings?
Merry Christmas!
Nicely written and easy to follow
ReplyDelete